


.avif)
Push authentication offers a secure and convenient password-free way to verify user identity with just a tap on their mobile device. Let's see how you can implement this in your React Native application using Authsignal.
What is Push Authentication?
Push authentication enables users to verify login attempts with a simple tap on their mobile device. When someone tries to access an account from a web browser, the account owner receives an authentication request on their phone. They can then approve or deny the login attempt directly from their device.
This approach is based on public key cryptography:
- A private/public key pair is generated
- The private key remains securely on the user's mobile device
- The public key is stored by Authsignal
Authentication Flow
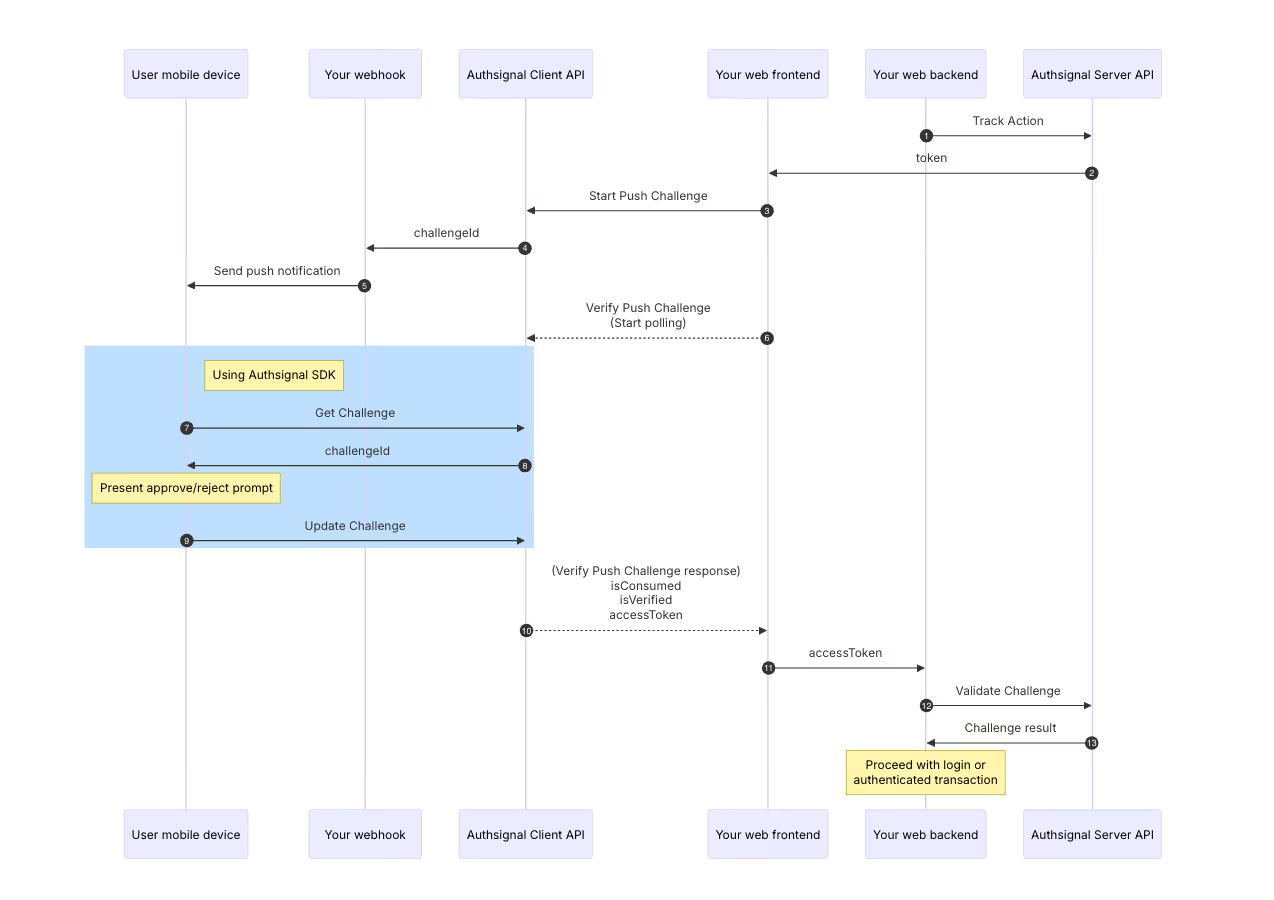
The complete flow is as follows:
- Track Action: The sequence starts with your server API tracking an authentication action
- Challenge Initiation: The system creates a challenge and sends it to your user's device
- Push Notification: The user receives a notification on their mobile device
- User Response: Using the Authsignal SDK, the user approves or rejects the request
- Verification: The system verifies the user's response using cryptographic signatures
- Result: After polling for the result, the server validates the challenge
- Access Granted: Upon successful validation, the authenticated transaction proceeds
Sequence Diagram
Below is a sequence diagram illustrating the complete push authentication flow:
Prerequisites
Before users can receive push authentication challenges, they must first enroll their device by adding push credentials through the mobile SDK. This one-time setup creates the cryptographic keys needed for secure authentication.
Important: Push challenges can only be initiated for users who have already enrolled at least one push authenticator. Without this enrollment, attempts to initiate push authentication will fail.
Let’s Start With Implementation
The complete source code is available in our GitHub repository. This guide's code samples are taken directly from this implementation.
Setting Up the SDK
First, initialize the Authsignal SDK in your React Native app:
// from src/config.ts

import {Authsignal} from 'react-native-authsignal';

const authsignalArgs = {
  tenantID: 'your-tenant-id',
  baseURL: 'https://api.authsignal.com/v1',
};

export const authsignal = new Authsignal(authsignalArgs);
To get your Tenant ID and Base URL, head to Authsignal Portal.
Registering the Device
When a user first opens your app, you'll need to register their device:
// from src/HomeScreen.tsx

useEffect(() => {
  (async () => {

    // Check if device is already registered
    const credentialId = await AsyncStorage.getItem('@credential_id');

    if (credentialId) {
      // Device is already registered
      // Check for any pending authentication challenges
      const {data, error} = await authsignal.push.getChallenge();

      if (data?.challengeId) {
        navigation.navigate('PushChallenge', {challengeId: data.challengeId});
      }
      return;
    }

    // Register new device
    const {error} = await authsignal.push.addCredential();

    if (!error) {
      // Get and store the credential ID
      const {data: credential} = await authsignal.push.getCredential();

      if (credential) {
        await AsyncStorage.setItem('@credential_id', credential.credentialId);
      }
    }
  })();
}, [navigation]);
This code handles two critical operations:
- Registering a new device (generating the key pair)
- Checking for any pending authentication challenges
Creating the Challenge Response UI
Next, implement a screen where users can approve or deny authentication requests:
// from src/PushChallengeScreen.tsx

export function PushChallengeScreen({route, navigation}) {
  const {challengeId} = route.params;

  return (
    <View>
      <View style={styles.container}>
        <View style={styles.header}>
          <Text style={styles.headerTitle}>Approval required</Text>
        </View>
        <Text style={styles.description}>
          Your approval is required to authorize a login request.
        </Text>
        <Button
          theme={'secondary'}
          onPress={async () => {
            await authsignal.push.updateChallenge({
              challengeId,
              approved: true
            });
            navigation.goBack();
          }}>
          Approve
        </Button>
        <Button
          theme={'secondary'}
          onPress={async () => {
            await authsignal.push.updateChallenge({
              challengeId,
              approved: false
            });
            navigation.goBack();
          }}>
          Deny
        </Button>
      </View>
    </View>
  );
}
Configuring Navigation
Add the challenge screen to your navigation stack:
// from src/App.tsx

<Stack.Screen
  name="PushChallenge"
  component={PushChallengeScreen}
  options={{presentation: 'transparentModal'}}
/>
Cleanup on Logout
When a user logs out, clean up their push authentication registration:
// from src/App.tsx

const onSignOutPressed = async () => {
  // Remove credential ID from storage
  await AsyncStorage.removeItem('@credential_id');

  // Remove push credential from server
  const {error} = await authsignal.push.removeCredential();

  if (error) {
    console.error('Error removing push credential', error);
  }

  // Complete sign out
  await signOut();
  setIsSignedIn(false);
};
How It Works: The Complete Flow
- Device Enrollment: The user's device must first be enrolled for push authentication using
addCredential() - Login Attempt: The user attempts to log in from a web browser on another device
- Challenge Creation: The server creates an authentication challenge through Authsignal
- Challenge Detection: When the user opens your app, it checks for pending challenges
- User Response: The app displays the challenge details, and the user can approve or deny the login
- Authentication Completion: Based on the user's decision, the login in the web browser either succeeds or fails
Key API Methods
The Authsignal React Native SDK provides several methods for push authentication:
Adding a Credential
await authsignal.push.addCredential({ token: "eyJhbGciOiJ..." });
Getting a Challenge
const {data, error} = await authsignal.push.getChallenge();

if (error) {
    // The credential stored on the device is invalid
} else if (data) {
    // A pending challenge request is available
    // Present the user with a prompt to approve or deny the request
    const challengeId = data.challengeId;
} else {
    // No pending challenge request
}
This checks for any pending authentication requests.
Updating a Challenge
await authsignal.push.updateChallenge({
  challengeId,
  approved: true,
});
This sends the user's response (approve or deny) back to the system.
Removing a Credential
await authsignal.push.removeCredential();
Benefits of Push Authentication
- Enhanced Security: Eliminates password vulnerabilities
- User Convenience: Simple tap instead of typing passwords
- Reduced Friction: Faster authentication process
- Device-Based Security: Authentication tied to a physical device
- Cryptographic Verification: Uses public key cryptography for strong security
Conclusion
Push authentication offers a significant improvement over traditional methods, combining security with user convenience. By implementing it in your React Native app, you provide users with a modern, secure authentication experience that feels effortless.
Authsignal offers dedicated SDKs for iOS, Android, React Native, and Flutter, so you can implement push authentication regardless of your platform choice.
.svg)


