



This blog post is part 1 in a series of blog posts.
- Part 1: How to pair AWS Cognito with Authsignal to rapidly implement passwordless login and MFA.
- Part 2: How to pair AWS Cognito with Authsignal to implement passkeys in a web app.
- Part 3: How to pair AWS Cognito with Authsignal to implement passkeys in a native mobile app.
AWS Cognito has a flexible and powerful integration model for implementing custom MFA and passwordless login flows using Lambda triggers. While the out-of-the-box options for MFA which Cognito offers may be limited - namely SMS and authenticator app - its custom authentication challenge model provides a great way to offer users a wider range of authentication options. By pairing Cognito with Authsignal, you can offer email OTP, email magic link, SMS OTP (including via WhatsApp), authenticator app, passkeys or security keys, push, and facial biometrics. Authsignal enable you to deploy step up authentication with Cognito.
Passwords vs passwordless
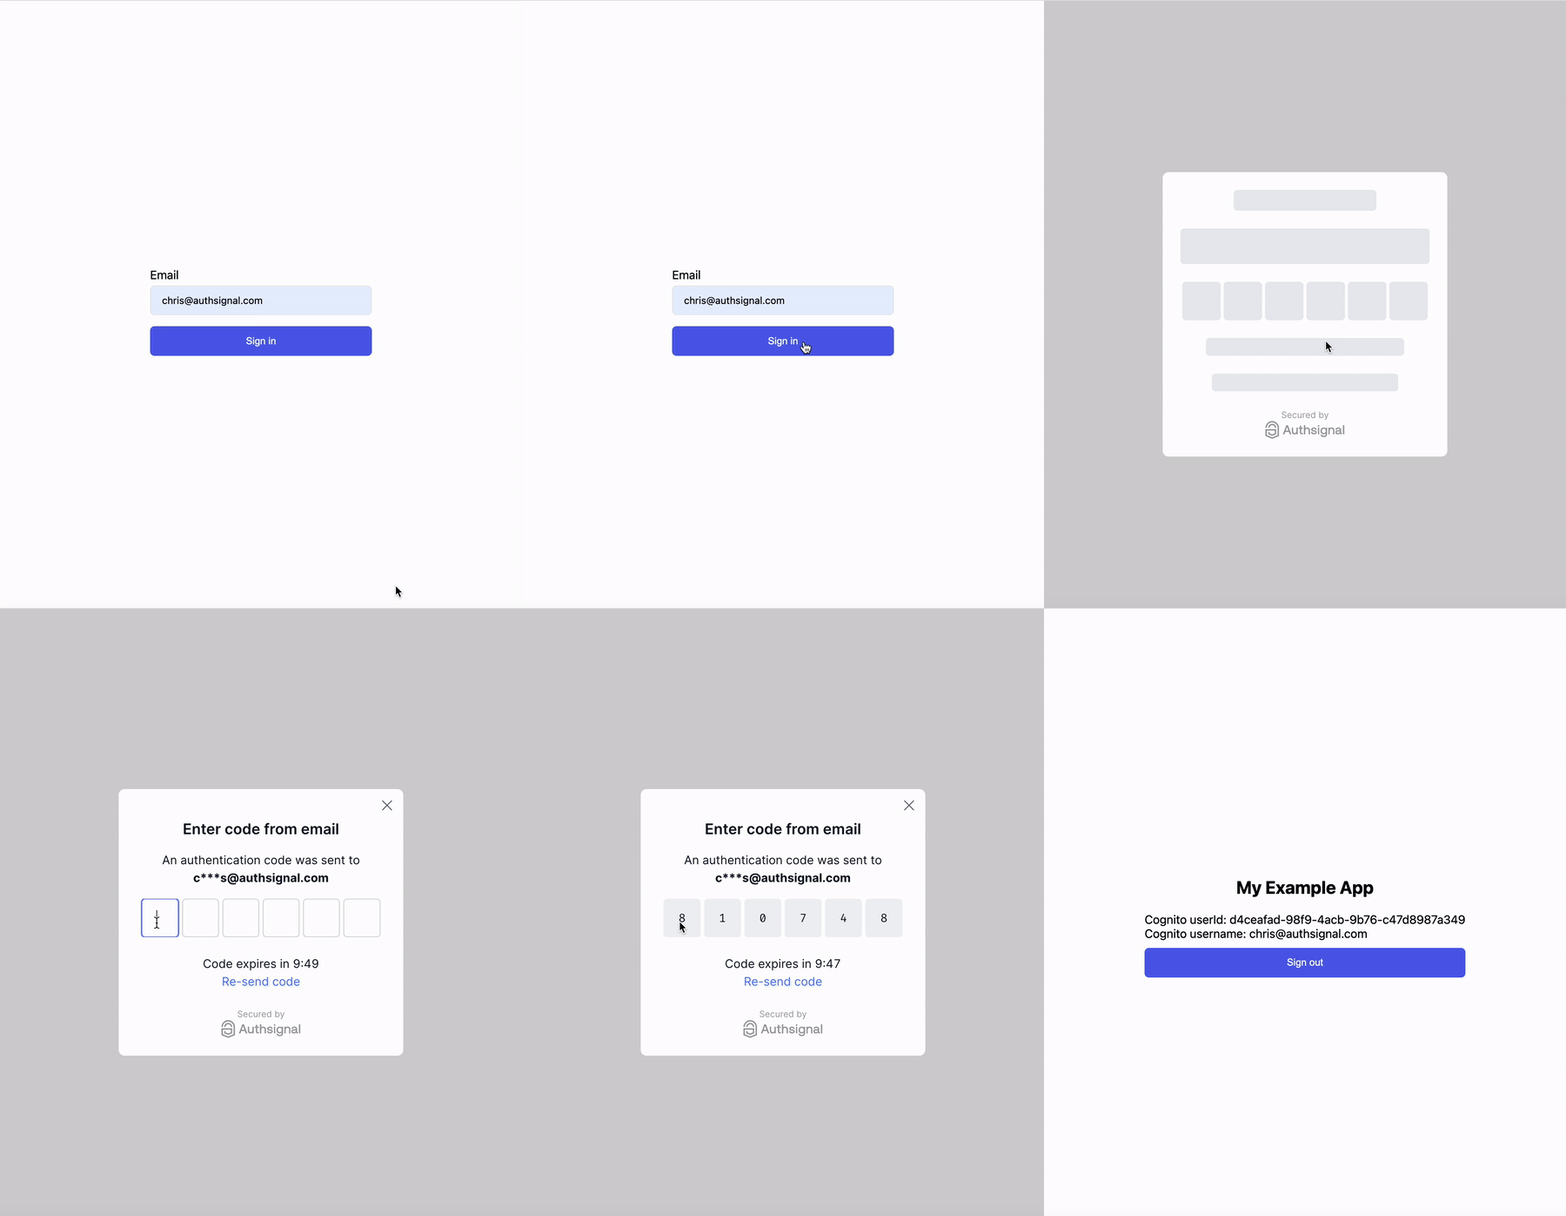
This blog post will focus on how to implement passwordless login using the Authsignal pre-built UI with email OTP as an authentication method.
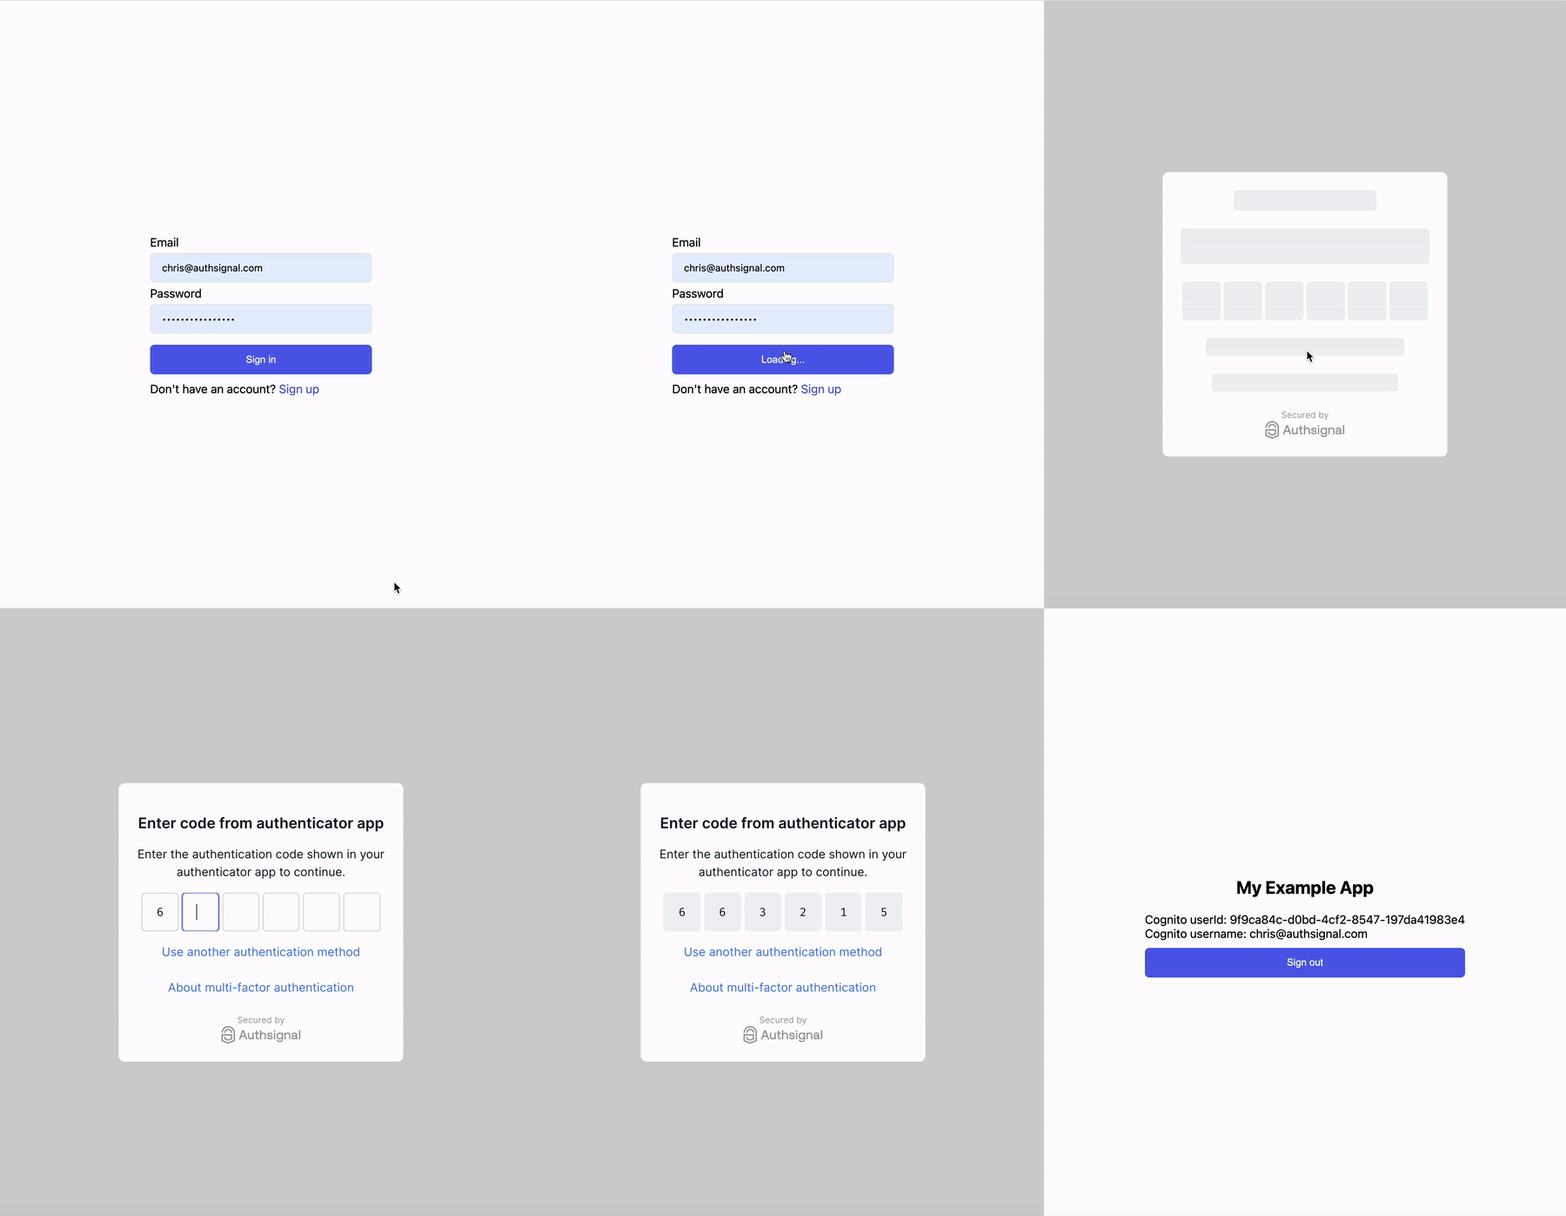
However, if you still need to support passwords, you can use Authsignal to present a secondary MFA challenge after Cognito has validated the user’s password.
Full example code
You can find the full code example for passwordless login on Github and the changes required for password + MFA on this branch.
The custom authentication challenge lambdas
The example requires four lambdas, which can be deployed into your AWS environment and then connected to your user pool.

Create Auth Challenge lambda
This lambda uses the Authsignal Node.js SDK to return a url back to the app, which can be passed to the Authsignal Web SDK to launch the Authsignal pre-built UI.
export const handler: CreateAuthChallengeTriggerHandler = async (event) => {
  // This can be any value which defines your login action
  const action = "cognitoAuth";

  const { url } = await authsignal.track({
    action,
    userId: event.request.userAttributes.sub,
    email: event.request.userAttributes.email,
  });

  event.response.publicChallengeParameters = { url };

  return event;
};
Verify Auth Challenge Response lambda
This lambda takes the result token returned by the Authsignal Web SDK and passes it to the Authsignal Node.js SDK to validate the result of the challenge.
export const handler: VerifyAuthChallengeResponseTriggerHandler = async (
  event
) => {
  // This must be the same value used in the previous lambda
  const action = "cognitoAuth";

  const { state } = await authsignal.validateChallenge({
    action,
    userId: event.request.userAttributes.sub,
    token: event.request.challengeAnswer,
  });

  event.response.answerCorrect = state === "CHALLENGE_SUCCEEDED";

  return event;
};
The app code
The Amplify SDK and the Authsignal SDK can be used together to implement passwordless login with a minimal amount of code.
Step 1 - Call the Amplify SDK signIn method
First, we need to initiate sign-in by calling the Amplify signIn method and passing the email which the user has entered. This will invoke the Create Auth Challenge lambda, which we implemented previously, and return an Authsignal URL, which we’ll use to present an email OTP challenge. We set the authFlowType here to “CUSTOM_WITHOUT_SRP” because we’re not including a password.
const { nextStep } = await signIn({
  username: email,
  options: {
    authFlowType: "CUSTOM_WITHOUT_SRP",
  },
});

const url = nextStep.additionalInfo.url;
Step 2 - Call the Authsignal SDK launch method
In this step, we pass the URL obtained from the previous step to the Authsignal SDK launch method. We set the mode to "popup," so the challenge is presented modally within an iframe on the same page. Once the user completes the challenge, the SDK asynchronously returns a token, which we’ll validate in the final step.
const { token } = await authsignal.launch(url, { mode: "popup" });
Step 3 - Call the Amplify SDK confirmSignIn method
Finally, we pass the token returned by the Authsignal SDK to the Amplify SDK confirmSignIn method. This will invoke the Verify Auth Challenge Response lambda and validate that the user has successfully completed the email OTP challenge in the previous step.
const {isSignedIn} = await confirmSignIn({ challengeResponse: token });If the Authsignal token is valid, Amplify will create an authenticated session and issue an access token for the user.
Using the AWS SDK instead of Amplify
As the steps outlined above demonstrate, using Authsignal together with Amplify makes it easy to implement passwordless login in just a few steps. But it’s also simple to use the @aws-sdk/client-cognito-identity-provider library instead of Amplify. Because of the way that Amplify SDK maintains state between its signIn and confirmSignIn calls, it doesn’t work well if you need to redirect to another page in between these steps. This means that using the Authsignal pre-built UI in redirect mode isn’t possible. However, with the AWS SDK, you have the flexibility to launch the pre-built UI in either redirect mode or in popup mode. Below, we’ll cover how to use the AWS SDK to launch the pre-built UI in redirect mode.
Full example code
You can find a full example using Authsignal with the AWS SDK on Github.
Modifying the Create Auth Challenge lambda
Since we’re using redirect mode, we’ll need to specify the URL which the Authsignal pre-built UI should redirect back to once the user has completed the email OTP challenge. We do this by modifying the track call in the Create Auth Challenge lambda code.
export const handler: CreateAuthChallengeTriggerHandler = async (event) => {
  const { url } = await authsignal.track({
    action: "cognitoAuth",
    userId: event.request.userAttributes.sub,
    email: event.request.userAttributes.email,
    redirectUrl: "http://localhost:5173/callback"
  });

  event.response.publicChallengeParameters = { url };

  return event;
};
Modifying the app code
Step 1 - Use InitiateAuthCommand from the AWS SDK
This will invoke the Create Auth Challenge lambda, which we implemented above, and return an Authsignal URL, which we’ll use to present an email OTP challenge.
const input = {
  ClientId: "YOUR_COGNITO_CLIENT_ID",
  AuthFlow: AuthFlowType.CUSTOM_AUTH,
  AuthParameters: {
    USERNAME: email,
  },
};

const output = await cognitoClient.send(new InitiateAuthCommand(input));

const url = output.ChallengeParameters.url;

localStorage.setItem("username", email);
localStorage.setItem("session", output.Session);
In addition to obtaining the url, we also persist the Cognito username and session in local storage - this enables us to retrieve them again later after the user has been redirected back from the pre-built UI.
Step 2 - Call the Authsignal SDK launch method
In this step, we pass the URL obtained from the previous step to the Authsignal SDK launch method. If not specified, the SDK defaults to redirect mode, so we’ll use that.
authsignal.launch(url);Unlike the Amplify example above, we can’t await the result of this launch call. Instead, we have to implement a callback route, which the Authsignal pre-built UI will redirect back to after the challenge. This route will handle the logic of validating the result of the challenge and finalizing sign-in.
Step 3 - Use the RespondToAuthChallengeCommand from the AWS SDK
Our callback route will grab the Authsignal validation token from URL search params and pass it to the Verify Auth Challenge Response lambda via the RespondToAuthChallengeCommand, along with the username and session we persisted in local storage in the first step.
const input = {
  ClientId: "YOUR_COGNITO_CLIENT_ID",
  ChallengeName: ChallengeNameType.CUSTOM_CHALLENGE,
  Session: localStorage.getItem("session"),
  ChallengeResponses: {
    USERNAME: localStorage.getItem("username"),
    ANSWER: JSON.stringify({
      token: (new URLSearchParams(window.location.search)).get('token'),
    }),
  },
};

const output = await cognitoClient.send(new RespondToAuthChallengeCommand(input));

const accessToken = output.AuthenticationResult?.AccessToken;
const refreshToken = output.AuthenticationResult?.RefreshToken;

// Persist the Cognito accessToken/refreshToken in local storage or as required
For more detail, you can follow our guide on integrating Authsignal with the AWS SDK from your app.
Using the AWS SDK from your backend
It’s also possible to use the AWS SDK from your backend in a server-side integration. In this case, you would use the AdminInitiateAuth command and the AdminRespondToAuthChallenge command. For more detail on this approach, you can refer to our guide on integrating Authsignal with the AWS SDK from your backend. Note that this approach requires configuring your user pool settings in a slightly different way as you need to use a client secret when authenticating to Cognito from your backend.
Summary
It can sometimes feel confusing to navigate all the different ways to integrate with AWS Cognito. In this blog post, we’ve outlined some of the key ways to integrate and how Authsignal can help significantly speed up the implementation process.
.svg)


